

Showing posts with label green. Show all posts
Showing posts with label green. Show all posts
Saturday, March 17, 2012
Happy St. Patrick's Day Nails
Just got this new spring green from Essie and thought it would be perfect for today! And of course I had to add a little stamp from Bundle Monster! Hope you are having a great St. Paddys day!
Monday, February 20, 2012
NOTD: Nicole by OPI Kloe had a Lam Lam
Thought this was a perfect color in anticipation for the two night premiere of Khloe and Lamar! When the Kardashian Kolors came out there was one color in it that I HAD to HAVE, and this is it! Khloe had a Lam Lam is the most awesome green I own! I love how dark it is and the awesome blue tones in it!

Thursday, January 19, 2012
Check out my new favorite green!
Hit up Rite Aid yesterday and saw the new line of Revlon colors and this gorgeous green just spoke to me and said "take me home with you!" So I did! It's called Posh. What do you think?
Thursday, December 22, 2011
Zoya Christmas Matte French Twist
I love Zoya's matte polishes. I think I own almost every color they've made in the matte finish because they are just so freaking gorgeous! Today's manicure was a no brainer. I loved the trend that Zoya promoted earlier this year called the French Twist, so I decided to create a Christmas one using their matte colors: Verushka (green) and Posh(red). You may remember the french twist look I did with Dove and Portia from August or the very summery citrus french twist I did in July with Pippa and Jancyn. As you can tell, I'm a big fan of the look. But now looking back I wish I would've added a little more design to this manicure. Oh well! Enjoy!


Wednesday, December 21, 2011
Pretty Christmas Party Nails
I had my company Christmas party last week, and I wanted a really classy ornate Christmas design on my nails for the event. Here is what I came up with:


 Check this out ^ I even managed to do the design on my left hand!
Here are the steps I took:
Funny Story: I actually went and got a professional pedicure the day of my company Christmas party, and the ladies at the nail salon were studying my manicure HARDCORE! They all couldn't believe I did it myself, and wanted to know how I did it of course! ;)


Here are the steps I took:
- Drew a diagonal french on each nail with Sally Hansen Insta Dri Silver Sweep.
- Using a detailing brush, I created the cute little swirls in Zoya Verushka. I followed this tutorial on Youtube to teach me how to draw the swirls.
- After a coat of Seche Clear I added three little red rhinestones to represent some Holly Berries.
Funny Story: I actually went and got a professional pedicure the day of my company Christmas party, and the ladies at the nail salon were studying my manicure HARDCORE! They all couldn't believe I did it myself, and wanted to know how I did it of course! ;)
Tuesday, November 8, 2011
Neon Chevron French Tips
This post is from the vault, man do I miss my long nails! I can't wait until they grow back to this length! *sigh* I got this really cute Sally Hansen color recently (Fairy Teal), and I wanted to use it right away. So I did a free-hand chevron tip with Milani's Totally 80's accented with a black striper

 I think chevron tips are a great way to change up the typical french manicures.
Wednesday, October 26, 2011
Halloween Week - Day Two: Witch Nails


Color is called Totally 80's (I layered it over white because otherwise it would take 5 coats to get this tone.) Black sparkly tips are from Love and Polish Charcoal from Forever 21. Witch Hat is from Bundle Monster 209 stamp and the little witches are from BM 13
Tuesday, August 30, 2011
Margarita Inspired NOTD
All that crazy weather this week was driving me to drink, so I thought it was about time I did a cocktail inspired mani! Little known fact: I love me some margaritas, so that is the cocktail that inspired this manicure.

 I started with a base coat of Sally Hansen Lickety Split Lime, and layered Zoya Tangy over top. Then I did the tips with a Citrus Sparkle Top Coat from Love and Polish, this reminded me of the salt rimmed glasses. Then, I sliced up some lime fimo for the little lime wedges, which I think is so stinkin cute.
I'm getting thirsty just looking at these nails! Do you like them? What's your favorite cocktail? Any other cocktail inspired manicures you'd like to see?


I'm getting thirsty just looking at these nails! Do you like them? What's your favorite cocktail? Any other cocktail inspired manicures you'd like to see?
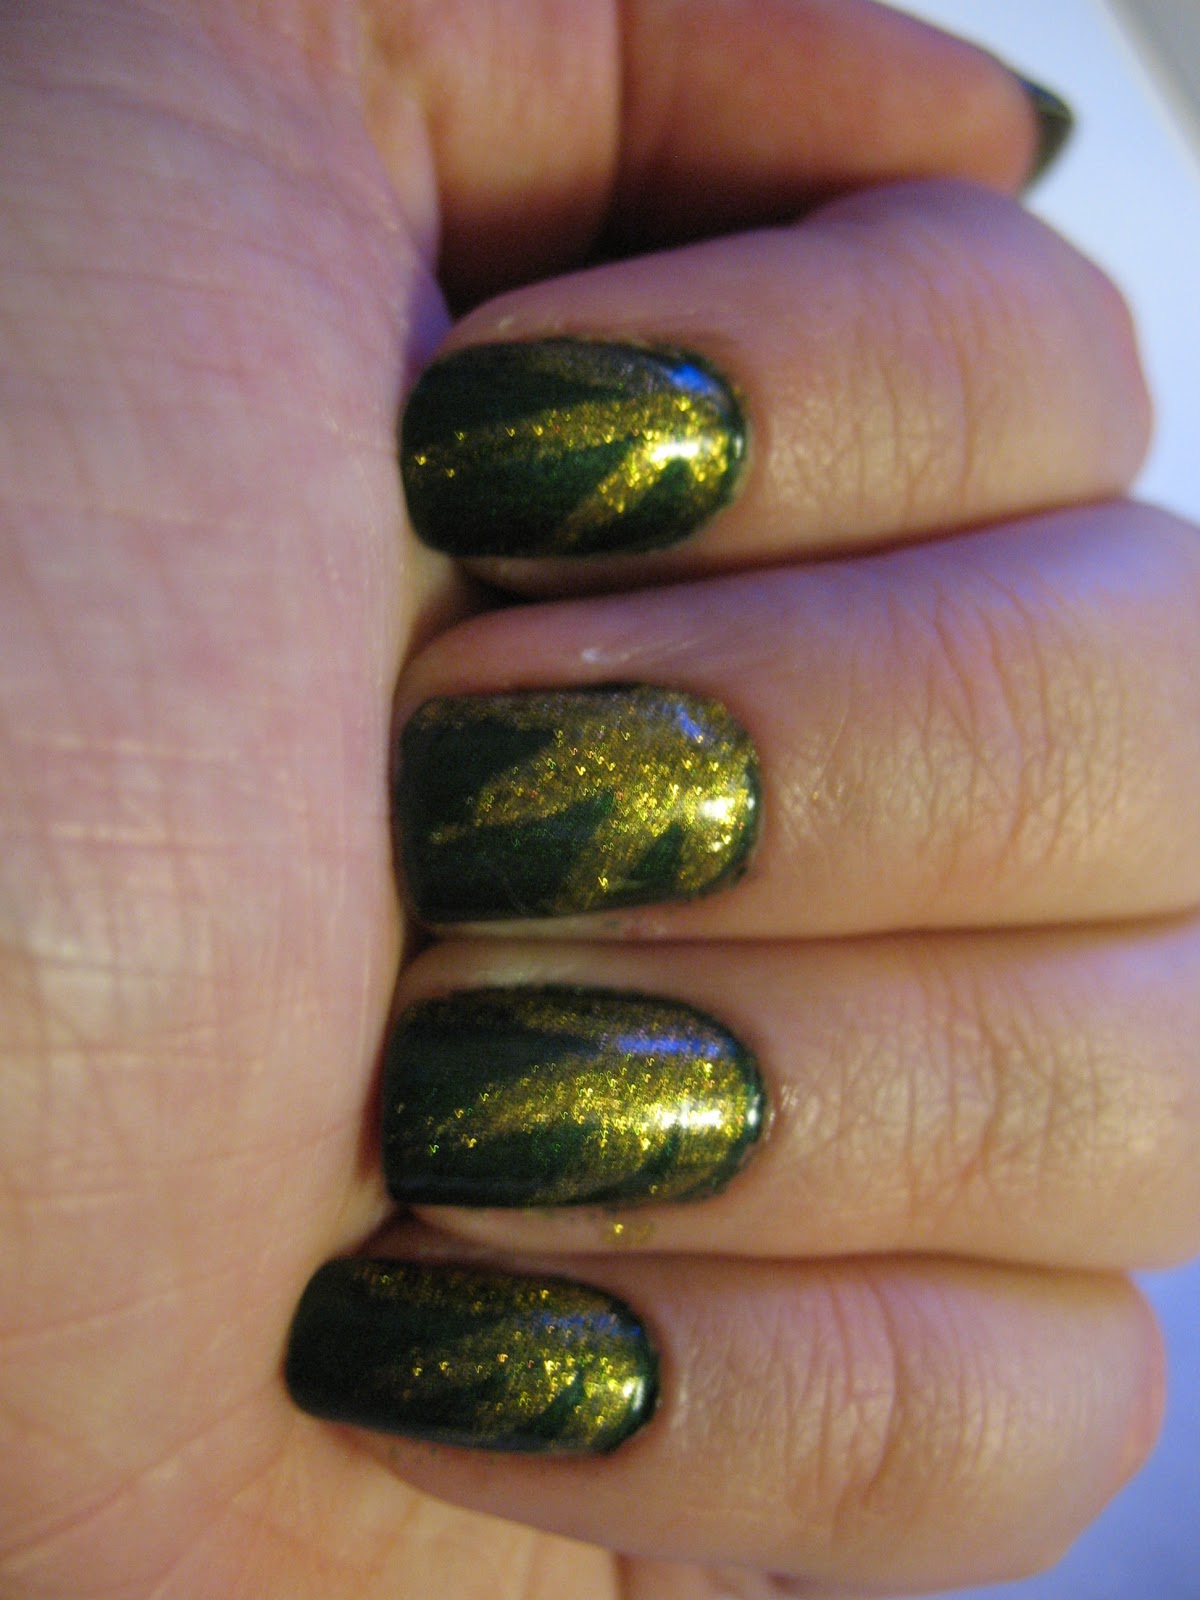
Tuesday, August 2, 2011
Getting ready for fall with Zoya Envy and Edyta
Zoya Envy is such a gorgeous dark green! Perfect for fall and comes off as black with a green tint in some lights. Here is a swatch:
 I decided its perfect match is Zoya Edyta, which is pretty much Envy with a ton of gold sparkles. SO I took my Envy and sponged the tips with Edyta to create a cute gradient effect.

 These two are just a match made in heaven! I love them both. This manicure is definitely getting me in the fall spirit! As much as I love the summer brights, there is something soooo fun about the dark vampy hues for fall! :)


Wednesday, July 27, 2011
Pink Wednesday Tape Manicure Tutorial!
Hi lovelies! Sorry for the lack of posts this week. My job has been very demanding of my spare time, so I haven't had a chance to post all the adorable manicures I've been doing lately, but I promise to make some time to schedule some posts because I definitely have a lot to show you!
First, I just want to thank everyone for the great feedback I've been getting with the giveaway entries! It's not too late to enter, so do it now! One of the requests I got was to add some functionality so that you can subscribe to my blog through email, so that is now a new block on the ride sidebar, I hope you'll use it! I also got a request for more tape manicures with tutorial, so I have one of those for you today, and I'll have another one for you next pink Wednesday using the same colors in a different way.
I'll be honest with you, I've had trouble with tape manicures in the best screwing up my base coat, which is why I don't post them often, but I think I've found the solution! So, first step is to start with a base color of your manicure. I'm starting with Zoya Purity:
 I put a coat of Seche Vite over this and let it dry for a long time to avoid smudging my base coat. Then I prepped my tape for my manicure. For the diagonal french, I just needed to pull off a strip of regular tape, then I touched the tape a few times to remove some of the stickiness, and then placed it on my nail diagonally.
 Press the tape down well and then paint your second color always going in the same direction so you don't accidentally get under the tape. My second color is one of the new Zoya Mod Matte shades called Lolly.
 Once your finished painting, peel off the tape. Don't wait for it to dry, this will make sure the tape removes cleanly.
 Now that I have my perfect diagonal french, I took a great neon green nail art striper from NaildeRoyale.com along with some cute star sequins also from Nail De Royale and played with them. You'll see in the pictures below, I played with the placement a bit before I decided on my favorite placement.


 This turned out to be such a fun bright manicure! I got a lot of compliments on it today.
The neon green striper, star sequins, and Zoya Lolly were all sent to me for my review from Nail De Royale. If you are looking for good prices on nail polishes, and nail art supplies, definitely check them out!
Hope you liked my first tape manicure tutorial!
First, I just want to thank everyone for the great feedback I've been getting with the giveaway entries! It's not too late to enter, so do it now! One of the requests I got was to add some functionality so that you can subscribe to my blog through email, so that is now a new block on the ride sidebar, I hope you'll use it! I also got a request for more tape manicures with tutorial, so I have one of those for you today, and I'll have another one for you next pink Wednesday using the same colors in a different way.
I'll be honest with you, I've had trouble with tape manicures in the best screwing up my base coat, which is why I don't post them often, but I think I've found the solution! So, first step is to start with a base color of your manicure. I'm starting with Zoya Purity:


The neon green striper, star sequins, and Zoya Lolly were all sent to me for my review from Nail De Royale. If you are looking for good prices on nail polishes, and nail art supplies, definitely check them out!
Hope you liked my first tape manicure tutorial!
Thursday, June 23, 2011
NOTD: OPI Stranger Tides
When I saw OPI's announcement of their Stranger Tides collection, this was the one color I just HAD to have. As you saw on Monday's post, I finally got my hands on this beauty last week! Here is a swatch of the beauty:
 Stranger Tides is soooo gorgeous! I just love it's creamy murky greenness! I decided to pull out my dotting tool and give it some cute little dots using Zoya Shawn and Pipppa.


 I'm in love with this simple little manicure. What do you think? If you don't have Stranger Tides yet, GET IT NOW!


Tuesday, June 7, 2011
China Glaze Four Leaf Clover with a Herringbone Design!
So, I'm kind of in love with China Glaze Four Leaf Clover. Around St. Patty's Day EVERYONE was using this color and it became such a lemming of mine. I wanted it so bad! So, when Sally had their free China Glaze promotion last month, I had to use it to get this gorgeous color, and let me tell you, it lived up to its reputation of a GORGEOUS Kelly Green.
 Please forgive my crappy iphone pic of the swatch. I did this mani over at my mom's and was only able to grab a quick snapshot on my phone before I started stamping.
 Here is my final manicure. I used BM 201 plate for the herringbone pattern. I really loved this manicure. It felt so trendy to me! Speaking of trendy, the same night I did this mani, I also reunited with my lover, Pippa, this time on my toes! :D
 Something about yellow toes makes me soooooo happy! BTW, check out my new ottoman from Homegoods, isn't it cute? Homegoods is definitely a weakness of mine! I always bring home the cutest decor stuff from there.
A bit of warning on these vivid China Glaze colors: THEY STAIN! I use a base coat all the time, and I only ever have trouble with my China Glaze colors staining my nails. Does anyone else have problems with this brand and staining? Do I really have to buy a CG base coat to wear their gorgeous colors? Any tips for me on these, please tell me I'm not the only one that has this problem with China Glaze. One time I accidentally wore Shower Together without a basecoat on my toes and I STILL have a little staining on my big toe from it. Lesson learned, for sure. Just wish there was a way to wear these colors without the staining.


A bit of warning on these vivid China Glaze colors: THEY STAIN! I use a base coat all the time, and I only ever have trouble with my China Glaze colors staining my nails. Does anyone else have problems with this brand and staining? Do I really have to buy a CG base coat to wear their gorgeous colors? Any tips for me on these, please tell me I'm not the only one that has this problem with China Glaze. One time I accidentally wore Shower Together without a basecoat on my toes and I STILL have a little staining on my big toe from it. Lesson learned, for sure. Just wish there was a way to wear these colors without the staining.
Friday, March 18, 2011
Green Week Finale!
As hinted earlier this week, I decided to close Green Week off with Zoya's Gemma from their Intimate collection. I was a little stuck on what art to put Gemma. I was just so struck by how smooth and gorgeous my base coat went on, that I just didn't want to mess with it. So I lived with it for it for a day.

And today I decided to just add a simple little flower (fauxnad plate M66) to one nail and added this subtle gold shimmer top coat that I have. The brand is Diadora. It has no other information on it. I think it came from one of those bulk makeup gift sets a million years ago or something. I love how subtle it is though.

What do you guys think? I'll be honest, when I looked at the Intimate collection, Gemma was the one I was least excited about, but now that I've tried it I love it! I'm not sure it's meant for my skin tone, but I don't care, I'm kind of loving the army green/grayness of it.
Thursday, March 17, 2011
Green Week - Day Four Happy St. Patrick's Day
Man, I wish I had something cuter to show you than this, but that was what was such a great challenge of green week, I had to work with what I had. So, I call this one pot of gold! I started with Zoya Verushka as my base:

This is the only matte color and I have, but I love the effect of mattes! It's soooooo velvety! But, of course I went and ruined it with a shiny top coat and my sparkly gold striper polish.
 Oye! Please forgive me! I think I just went a little too sparkle happy and ruined the gorgeous matte! Oh well, there is always tomorrow!
As a side note, does anyone know why blogger is rotating my images when I upload them? that last one needs to go counter clockwise 90 degrees, but I don't know how to change it and why it just didn't upload the way it looks on my computer. *sigh*

This is the only matte color and I have, but I love the effect of mattes! It's soooooo velvety! But, of course I went and ruined it with a shiny top coat and my sparkly gold striper polish.
As a side note, does anyone know why blogger is rotating my images when I upload them? that last one needs to go counter clockwise 90 degrees, but I don't know how to change it and why it just didn't upload the way it looks on my computer. *sigh*
Wednesday, March 16, 2011
Green Week - Day Three
Green Gradient St. Paddy's Day!

This was my first time getting a successful gradient effect. I'm learning that light colors and very light coats are the key to successful gradient effects. I started with a base coat of Zoya Purity and then I stamped with two more of my Zoya greens: Tangy(lighter green) and Midori(darker green) Then I stamped the shamrock from fauxnad plate m71 using Konad special white polish, then added a cute little green rhinestone for a little extra bling :)
In other nail news: I got my Zoya Intimate collection in the mail yesterday! *insert happy dance here* The package came with a catalog previewing the new summer colors! The ModMatte collection looks so freaking hot! I anticipate all three of those colors to be my go to shades this summer! SO HOT!!! I can't wait to finally be able to use the intimate collection next week when green week is over! I might even have to sneak in Gemma this week since it is technically green...:)
Tuesday, March 15, 2011
Green Week - Day Two
I'm going to call this one Funky Neon Half Moon
 For this manicure I started with Zoya Purity as my base, then I stamped a crisscross shape from Konad stamp m64 using Sally Hansen Insta-Dri Lickety Split Lime. This got me the cute shape at the bottom, and then I just filled in the rest very carefully with the lime color. To finish it off, I added a cute green rhinestone from a set I got on eBay.
Then, tragedy struck...

TWO NAILS IN ONE NIGHT!!!!! :( What is it about the kitchen that always messes up my nails? With the dishes and the chopping and everything else, it's just a dangerous place!

Then, tragedy struck...

TWO NAILS IN ONE NIGHT!!!!! :( What is it about the kitchen that always messes up my nails? With the dishes and the chopping and everything else, it's just a dangerous place!
Monday, March 14, 2011
Green Week - Day One!


For my first green manicure I went with Zoya Shawn as my base. Then I stamped flowers from M69 using Konad Special Yellow polish. Then I stamped The butterflies from M36 using the Konad Special White Polish
Friday, March 11, 2011
Green Week!

Polishes above from left to right: Zoya Envy, Zoya Shawn, Zoya Verushka, Zoya Eny, Zoya Irene, Zoya Midori, Sinful Colors San Francisco, Art Deco Bright Green, Sally Hansen Lickety Split Lime, and Milani Totally 80's
Wednesday, March 9, 2011
Milani Neon crazyness!
After getting Milani Neon Totally 80's I really wanted to use it in my next manicure with Milani Neon Fresh Teal.

I alternated nails with the different colors and stamped with Konad special white polish using plate M64. I love the color of Totally 80's, but it took like 4 coats to get good coverage and it took forever to dry! I definitely think it will be fun for summer pedicures, but might not use it on my nails again. I was really hoping it would be awesome like Fresh Teal so I could stamp with it, but not so much...Oh well!

I alternated nails with the different colors and stamped with Konad special white polish using plate M64. I love the color of Totally 80's, but it took like 4 coats to get good coverage and it took forever to dry! I definitely think it will be fun for summer pedicures, but might not use it on my nails again. I was really hoping it would be awesome like Fresh Teal so I could stamp with it, but not so much...Oh well!
Subscribe to:
Posts (Atom)