Showing posts with label glitter. Show all posts
Showing posts with label glitter. Show all posts
Friday, October 12, 2012
Black, Gold, Sparkle, and Crackle Nails
Looked through my Helmer last night for some inspiration and found this awesome group of golds and blacks and crackles, so I decided to create this unique manicure that just so happens to match my outfit today! How convenient!
Thursday, August 9, 2012
Glitter Rainbow Gradient Zoya Nail Art
Zoya makes the prettiest glitter polishes! When faced with these four gorgeous glitters I just couldn't choose one, I have done a skittle look with these before, so today I decided to do a gradient look instead! I went with The Beauty Department's gradient technique of painting all the colors on the sponge at once. I had to apply the gradient a couple of times to get the dark hue I was looking for.
Here is the tools I used (from left to right) cosmetic sponge for gradient, Zoya Alegra, Zoya Mimi, Zoya Charla, and Zoya Apple.
Check out the other rainbow gradient look and a tutorial
Here is the tools I used (from left to right) cosmetic sponge for gradient, Zoya Alegra, Zoya Mimi, Zoya Charla, and Zoya Apple.
Monday, April 16, 2012
Dipped in Glitter
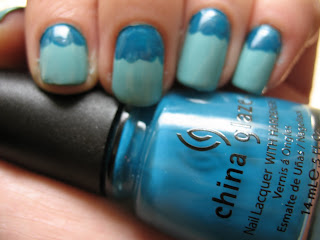
I'm obsessed with this teal from Color Club! I thought about leaving it plain but after watching Mizzchievious's latest nail art tutorial I decided to dip my tips in some glitter and take this look up a notch! :)
Labels:
blue,
color club,
french,
glitter
Thursday, December 8, 2011
Candy Cane Nails
This cute stamp is from my favorite Nail Art Store, Born Pretty Store. The red base color is Milani Red Sparkle. This color reminds me of Dorothy's ruby slippers from the Wizard of Oz! Such a great Christmas color!
Wednesday, November 23, 2011
Is it too early for Christmas Nails?
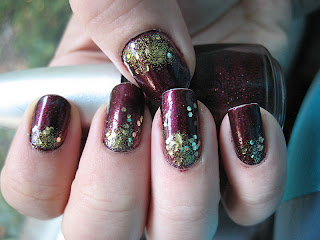
If it is then let's call these Redskins nails! Because that is actually what I initially was thinking about when I did this mani. See, coming from the D.C. area I was raised a die-hard Redskins fan! Trust me, its one of the most depressing teams to be a die-hard fan of! So, to show my Redskins spirit, I wanted to create a burgundy and gold nail look, and when it was done it looked really Christmasy, so I held off showing it to you until now.
I started this look with China Glaze Sugar Plum, which I think was in CG's holiday collection last year.
Then I did some gold glitter sponging on my tips and moons. I can never decide which look I like better. The gold glitter I used was a combination of Sinful Colors Paris and Milani Jewel FX in Gold.
So, if it is too early for Christmas nails, pretend these are Redskins nails, and if you aren't Redskins fans, then pretend these are Christmas nails! :D
Happy Thanksgiving to anyone celebrating tomorrow! Anyone know of any good Black Friday nail deals? If so, please share!
Also, don't forget about my two giveaways going on right now: Free Jewelry Giveaway and China Glaze Let It Snow Giveaway
Monday, November 14, 2011
Gray Sparkly Matte Nails
What is it about Sparkly Matte nails that is just sooo hot? I pin looks like this all the time on Pinterest, so I thought it was about time that I tried it myself. I started with a base coat of Zoya Kelly. I LOVE THIS COLOR! It is srsly one of my favorite Zoyas.
On top of Kelly, I sponged this glitter from NYC called Starry Silver Glitter just on my tips to give it a bit of a gradient look.
And then of course, I took this look to the next level with a matte topcoat. Mine is by hard candy, but any of the others will do just as good.
Want to know why I haven't been posting as much lately? Its because I fall in love with looks like this and wear them for days on end. So stinking cute.
Thursday, September 8, 2011
Vacation Mani Pedi
I recently went on a little beach vacay and decided to try out the new Sally Hansen Salon Effects for the week! I chose this black and white floral print, and I must say, I was very impressed with them! They stayed on the whole week. I got a TON of compliments! I think people just aren't used to seeing these yet. They were pretty easy to put on, but they do take some time to apply because you want them to look so perfect and last a long time, ya know?
In an effort to do a pedicure that lasted a whole week, I went with a glitter sandwich.
It lasted FOREVER, and really reminded me of one of my favorite pins on Pinterest:
Hope this gave you some ideas for long lasting manicures and pedicures for your upcoming vacays! xoxo!
In an effort to do a pedicure that lasted a whole week, I went with a glitter sandwich.
It lasted FOREVER, and really reminded me of one of my favorite pins on Pinterest:
Hope this gave you some ideas for long lasting manicures and pedicures for your upcoming vacays! xoxo!
Labels:
decals,
glitter,
pedicure,
sally hansen
Wednesday, September 7, 2011
Pink Starry Glitter
Simple little Pink Wednesday post for you today! I started with OPI Italian Love Affair as my base:
And then added a coat of NYX starry glitter over top:
I really like this subtle effect. I just wish someone would invent either 1) a glitter polish remover or 2) easy remove glitter polish! Why is it so hard to take off! Almost makes you not want to wear it, but its not gonna stop me! Any tips for glitter removal, or great removers or glitter polishes I should try? Let me know! Hope you are having a lovely pink Wednesday!
Monday, July 11, 2011
Party Nails!
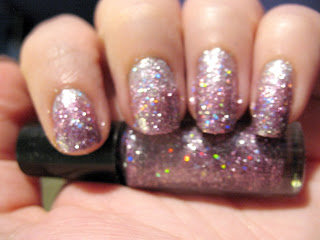
I am IN LOVE with this holo glitter from Claire's! When my future sister in law (Bevy) came home with it from a recent vacation, I very subtly reminded her about the importance of bringing back souvenirs for the family members who didn't get to go on vacation with you, and she promptly ran her little butt to Claire's to pick me up a bottle! LOL! Isn't she just the best? Don't worry, Bev, when I go on vacation in a few weeks, I'll be hitting up Ulta and bringing you home some goodies! :)
So here are some pics of me playing with "Glitter Top Coat" from Claire's. This really is a top coat, and I should have put on a more solid base coat, but I didn't which meant I had to do FOUR COATS to get full coverage! OUCH! It was a huge pain to remove, but ugh, how gorgeous is it under the crackle?
These felt like the perfect nails for a party! On my other hand I mixed things up by just doing my tips with the crackle, which I didn't love as much. The holo glitteriness of this polish is something I'll have to play with! Can't wait to try it over other colors! Crackle is Black Mesh by China Glaze, btw.
Labels:
china glaze,
crackle,
french,
glitter,
sparkly
Wednesday, July 6, 2011
Lunchtime Glitter Sandwich - YUM!
Happy Pink Wednesday, lovelies! Very exciting news! This little bloggy of mine reached 250 followers overnight! So, first I just want to send a big ol' THANK YOU to all of you for following me! It really brightens my day when I get comments about my manicures!
Ever since seeing this post by Gotham Polish I have been lusting after Milani Jewel FX Gems polish, and of course I couldn't find them anywhere! UGH! Don't you hate when that happens? Luckily, with a little googling I found an online store offering them up at a pretty reasonable price, so I snatched up all three colors! Now that I had my gems, I had to figure out the best sandwich combo, enter my testing nail wheel:
First step, I painted two "nails" in Zoya Portia and two in a new shade I just got from Sally Hansen called First Kiss. Then nail one and three got Milani Jewel FX Gems, nail two got a pretty pink sparkle from NYC called Dreamy Glitter (which looked gorgeous, but way too light for a sandwich), the last nail got Milani Jewel FX Gold. Let's see how they all look with my sheerest pink, Sally Hansen Petal Pusher on top:
The winner ended up being #1. #2 was just too light, #3 was too bright, #4 was awesome, but I wish there were more small gold glitters, and I don't have anything like that. So, here's the winning manicure:
SO STINKIN CUTE!!!!! Like sprinkles on a cupcake! :) Have you experimented with Milani Jewel FX yet? I've noticed on other bloggers that glitter sandwiches turns into a bit of an obsession, and I'm ready to play along! It is such a cool effect! Do you use test nail wheels to try out a manicure before you try it? I think it is a great tool for trying out ideas before having to commit a design to ten nails!
Tuesday, May 24, 2011
Sparkle Raindrops
On a recent trip to Sally's I saw For Audrey right beside Shower Together in the China Glaze display, and knew they not only HAD to be mine, but that they would look perfect together! So, here are the polishes I chose for today's manicure:
From left to right: NYC 105A Starry Silver Glitter, China Glaze For Audrey, China Glaze Shower Together.
Base coat is CG For Audrey, which is SUCH a gorgeous light blue.
Then I did something a little kooky! Instead of the typical half-moon, I used CG Shower Together to make it into a cloud shape instead.
Then, I added this Starry Silver Glitter because I knew it had big chunks that will look like rain drops. I really love this glitter. It's really cute.
I wish all rain showers were this sparkly! :) What do you guys think?
Labels:
blue,
china glaze,
glitter
Thursday, May 19, 2011
Gorgeous Glitter Gradient!
You guys, I am OBSESSED with the new line of gradient sets from Born Pretty Store. I just got the purple one in the mail and tried it out, and it is SO PRETTY! So, Born Pretty sells a set of three polishes that perfectly blend with one another to build a gorgeous gradient effect on your nails. Here is the purple one I got:
I first heard about this product from a YouTube tutorial by Born Pretty Store, which you should check out here. The way the product works is you start with a base coat of the first color all over your nail.
This was two coats of the first color.
Then I applied the second color to two-thirds of my nail.
Then I added the last color the the top one-third of my nail, and then tried desperately to capture the effect. I hope these pictures are doing this product justice.
I loved the final outcome!
So, in conclusion, this kit is super fun, is easy to apply and you get an AWESOME gradient effect. I definitely liked using this over the typical sponge gradient technique. Even cooler is that they have the set in two other color schemes: Green and Pink! The only con to this product is that it is definitely a pure glitter, which means removal SUCKED, but that's the price we pay for hot glittery nails, right girls?
Here are the links to the products if you want to check them out:
This product was sent to me for review, but the opinions are mine and not influenced in any way.
Labels:
born pretty store,
glitter,
gradient
Subscribe to:
Posts (Atom)


